Smart Shapes |
What do you want to do? |
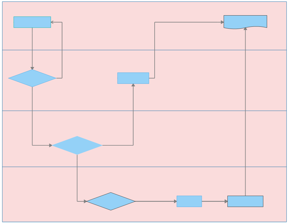
You can use Smart Shapes, such as swim lanes, funnels, or tables, in a flowchart or map to distinguish responsibility for sub-processes of a process. Swim lanes and funnels can be arranged either horizontally or vertically. For more information about formatting Smart Shapes see Work with objects. Smart Shapes are topic containers by default. Topic containers allow you to group floating topics or flowchart topics. When you reposition it, any contained flowchart or floating topics also move. For more information, see Group floating topics or flowchart topics. |
On the Insert tab, in the Objects group, click the Smart Shapes arrow, click Swim Lanes, and then click either Horizontal Swim Lanes or Vertical Swim Lanes.
Then, click the number of swim lanes to insert.
Click in the map where you want the swim
lanes, hold down the mouse button, and drag.
The more you drag, the bigger the swim lanes are.
Read Hint
Do one of the following:
Right-click the swim lane, click Format Object, type the desired number of lanes in the Lanes box, and click Apply. | or | Right-click the swim lane, click Lanes, and choose the number of lanes you want. |
Do one of the following:
Right-click the swim lanes, click Format Object, and type the desired number of pixels in the Height and Width boxes. | or | Click the swim lanes to display handles, and drag the handles. |
Right-click
a swim lane, and click Show Titles.
A check mark next to the command indicates that swim lanes are enabled.
Do any of the following:
Click a swim lane, then right-click and choose Format Object.
Double-click a swim lane title.
The Format Object dialog opens.
Do any of the following:
Click the Location drop-down menu, and choose where the titles display.
Click the Alignment drop-down menu, and choose how the title text is aligned relative to its swim lane.
Click the Orientation drop-down menu, and choose whether to display the title text vertically or horizontally.
On the Insert tab, in the Objects group, click the Smart Shapes arrow, click Funnel, and then click either Horizontal Funnel or Vertical Funnel.
Then, click the number of funnel segments to insert.
Click in the map where you want the funnel,
hold down the mouse button, and drag.
The more you drag, the greater the size of the funnel.
Do one of the following:
Right-click the funnel, click Format Object, type the desired number of segments in the Lanes box, and click Apply. | or | Right-click the funnel, click Lanes, and choose the number of segments you want. |
Do one of the following:
Right-click the funnel, click Format Object, and type the desired number of pixels in the Height and Width boxes. | or | Click the funnel to display handles, and drag the handles. |
On the Insert tab, in the Objects group, click the Smart Shapes arrow, and then click Table.
Then, click the number of rows and columns
to insert.
If you click More and drag,
you can interactively set the number of rows and columns.
Click in the map where you want the table,
hold down the mouse button, and drag.
The more you drag, the greater the size of the table
Right-click the table, and click Format Object.
Enter a number in the Rows and Columns boxes.
Click Apply.
Read Hint
Click a cell in the row or column to delete.
Right-click, and choose one of the following:
Delete Row
Delete Column
Hover over the border of
a swim lane, funnel segment, or table row or column until the cursor
becomes a double arrow .
Drag the border to resize.
Right-click a single swim lane, funnel segment, or table cell, and choose Rename.
Type a name in the Name box.
Right-click the swim lane, funnel segment, or table cell.
Choose Format Object.
Choose
a fill color from the Color
drop-down menu.
You can adjust the fill color transparency by moving the Transparency
slider.