On the Insert tab, click Databases, and then click Configure Database Connection.
From the Databases task pane
click  Configure
Connection.
Configure
Connection.
Configuring a MindManager database connection is an optional step that lets you set the visibility of database fields and tables, and create relations between database tables for the connection. If you do not configure the connection, you will be prompted for the necessary information when you add a database topic to your map that uses this connection.
When you choose a connection to configure, you'll see the database Configuration View, with the database structure of the selected connection shown in map form, and a document bar with commands for setting field and table visibility, and for creating relations between data. You'll also see any configuration information for this connection that you have already saved.
To see the configuration view:
On the Insert tab, click Databases, and then click Configure Database Connection.
From the Databases task pane
click Configure
Connection.
The configuration view shows the database structure as a map:
|
|
|
The document bar at the top of this view lets you specify the visibility of, and relations among, tables and fields within the database.
The visibility options determine which tables you can select when you run a query, and which fields will be visible in the database topics you add to your map from the query results. On the configuration map, topics display markers to indicate their status.
Select a field (subtopic) or table topic (main topic) in the map, and choose any of the following options:
|
Topic type |
Option |
Result when enabled |
Marker |
|
field (subtopic) |
Show field in topic text |
The field appears within the default topic text in the database topics on the map |
|
|
field (subtopic) |
Show field in custom properties |
The field is visible as a basic property in database topics. |
|
|
table (main topic) |
Hide table |
Hides the table so it doesn't appear in the in the Databases task pane list of tables for this connection. |
|
You can create relations within this view that point from data in one table to related data in a second table. When you add a database topic to your map from a query of the first table, you can chose to display its related data from the second table as subtopics by selecting the relation .
For example, you could set up a relation from the Customers table CustomerID
field to the Orders table CustomerID field.
Then, when you add data for a customer from the Customers table to your
map, you can choose to display the related data, in this case the Orders
for that customer. MindManager finds all the records in the Orders table
with a matching CustomerID, and displays these as subtopics.
You create a relation between two fields in different tables on the configuration map. You can set up multiple relations within the connection.
Select two topics (CTRL+click to select the second topic), and then click Create Relation on the Configuration View document bar.
The relation is assigned a default name. To change the name, click the callout and enter the new name.
The direction of the relation is defined by the order in which you select the topics: it points from the first topic to the second. To create a relation in two directions, you must create two separate relations.
Once you have set the configuration options, click Apply in the document bar to save the settings to the connection. You can now use these settings when you run a query.
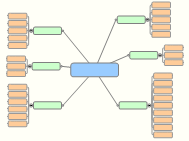
 The central topic is the connection name.
  Main topics represent tables in the database.
 Subtopics represent fields within each table.

