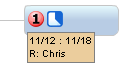
Task information is shown by marker icons (for priority and % complete) and as text displayed in a small window below the topic (for Resources, Duration, and Start and Due dates).
You can add Task Info to topics on your map, and optionally create new tasks in a task list from them.
When you create a new task from a topic, the topic and the task are linked. This means you can update the task from either the map or in Tasks view.
Task information is shown by marker icons (for priority and % complete) and as text displayed in a small window below the topic (for Resources, Duration, and Start and Due dates). |
|
Select a topic.
On the mapping window ribbon's Home tab, select the Priority and Progress icons you want to use.
To provide additional details, click Task Info and use the Task Info pane options to select and enter the information for the topic.
Hint: The Show Task Info and Show year in dates options apply to all task info on the map.
To change a topic's Task Info:
Right-click the Task Info text, and then click Change.
You can remove the textual task info displayed below a topic directly. (Task info icons can be removed in the same way as other icon markers.)
Right-click the Task Info text, and then click Remove.
Note: The task is not added to a project until you send it to the project's task list. While you can simply display and track tasks on a map, sending a task to a task list enables you to manage it using the Tasks functions.
You can send topics from your map to create tasks that are independent (not associated with a specific project), or added to the task list of an existing project, or in a new task list that you create at that moment. Hyperlinks are added to the map from map topics to the new tasks, and links are added to each new task’s Comments to connect it with its associated map topic. You can choose to send individual topics or entire branches, and optionally designate subtopics as blocking tasks for their parent.
To create new tasks from a topic:
On your map, select the topics you want to send to create new tasks, or select the parent topic(s) of branch(es) that contains the tasks you want to send.
On the ribbon's Home tab, click Create Tasks.
You can choose to send only the topics you have selected, or you can include their subtopics.
If you choose to include subtopics, you can also choose to designate their tasks as blocking tasks for their associated parent task.
In the dialog, select the destination for the new tasks.
Select None to add tasks to your general tasks list.
Select Existing task list to assign the task to a specific project's task list.
If you select New task list, enter its name. The task list is created immediately when you send the topics.
Click Send.
For each topic you send:
The topic text becomes the task name. If the topic text is too long ( > 255 characters) the excess text will be included in the task’s Comment.
Start Date and Due Date are assigned.
If the topic has a % Complete marker assigned to it, that value will become the Progress value for the new task.
No other task info or topic attributes (resource names, notes, etc.) are included in the new tasks you create.
You automatically become the Assignee and a Follower of all the tasks you create.
Each task you create contains a comment with a link back to its associated map topic.
The topic(s) used to create the task(s) gets a link that points to the associated task.
Notes: The map topics and tasks are linked. Changing the task in Tasks view will affect the map topic, and vice-versa. (For example, changing the Due Date in Tasks view will change the topic’s Due Date on the map.)
Version 9.3
script src="http://www.mindjet.com/js/onlinehelp.js" type="text/javascript">