Boundaries come in two basic types: grouping boundaries and summary boundaries.
Grouping boundaries can be used to emphasize the relationships between topics and subtopics with an outline surrounding an area on a map with your choice of line type and an optional fill color.
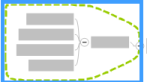
Summary boundaries can be used to reduce a set of subtopics into a single summary topic and then allow this topic to grow again.
You can add boundaries within boundaries. The default boundary formatting is determined by the style settings. Boundaries are not shown in Outline View.
What do you want to do?
Select the topic whose subtopics you want to group with the boundary.
On the Home tab, in the Insert group, click the Boundary arrow, and then click the boundary type.
Select the boundary (a blue box shows it is selected).
Do one of the following:
On the Home tab, in the Insert group, click Callout.
Right-click the boundary and click Insert Summary Topic.
You can expand the summary topic into a new topic tree by adding subtopics to it.
|
When you select a boundary, a blue box appears to show that it is selected. Then you can change the boundary's formatting. |
Select the boundary.
On the Home tab, use the Format group commands to change the Fill Color, Line Color, and Line type.
Do one of the following:
Right-click the boundary, and then click Format Boundary.
Select the boundary. On the Home tab, click the Boundary arrow, then click Format Boundary.
Double-click the boundary.
Choose the desired attributes for the boundary.
Click Style if you wish to save all the boundary's format settings as the automatic style for boundaries, or reset its style to the default formatting.
To create a boundary of the same style as an existing boundary you can copy the boundary to a new topic tree.
Right-click the boundary and use the Cut, Copy, and Paste commands in the Home tab Clipboard group.
Right-click the boundary, and then click Delete Boundary.