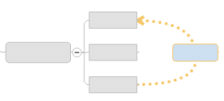
Sometimes a relationship exists between two (or more) topics, and you want to illustrate this on your map. You can add a relationship line that connects two topics, and label it if you wish. The default formatting for the arrow is determined by the map's style settings.
Relationships are not shown in Outline View.
On the Home tab or on the Insert tab, in the Insert group, click Relationship.
The cursor
changes to the relationship cursor  .
.
Click the first topic, and then click the second.
The relationship line appears to link the two topics.
Relationship lines follow an optimal path by default because their Auto Adjust attribute is enabled. If you move one or both of the topics connected by a relationship, the line will automatically adjust to follow an optimal path between the topics.
|
|
When you select a relationship, handles appear so you can re-shape it or change its connection point. |
Select the relationship, then drag the square yellow handles.
If you re-shape the line, the Auto Adjust option is automatically disabled. If you want the line to return to its optimal path you can re-enable the Auto Adjust option in the right-click menu and in the Format Relationship dialog (described below).
Select the relationship then drag the round red connection handle to another topic.
Select the relationship line(s).
On the Format tab, use commands in the Objects group to change the Relationship Shape and Line style, and in the Formatting group to change its color.
Do one of the following:
Right-click the relationship line, and then click Format Relationship
Select the relationship(s). On the Format tab, click the Relationship Shape arrow, then click Format Relationship.
Double-click the relationship
Choose the desired attributes for the line(s).
Click Style if you wish to:
Save as New Style Default: Save all the relationship's format settings as the automatic style for relationships. The settings become part of the current map's style. All existing relationships assume these attributes (unless they have been individually formatted), as will any new relationships you create. You can save these new settings as a Style Template that you can re-use on other maps. You can see these new attributes in the Modify Style view.
Reset to Style Default: Reset the relationship to the automatic formatting of the current style.
To reverse the end styles quickly, right-click the relationship line, then click Flip.
Right-click the relationship line.
Click Insert Callout.
When the generic callout appears select it to enter your text.
You can set an option to prompt for a callout for each relationship you add in the MindManager Edit options to auto-insert relationship callouts.
Right-click the relationship line.
Click Delete Relationship.
Use the Show / Hide command to temporarily hide relationships.
Once you have added a relationship you can quickly jump to the topic at either end of the line. This is especially useful on large maps where the relationship spans a long distance.
Right-click the relationship line.
Click Jump to {topicname}. A Jump To command is displayed for the topics at both ends of the arrow.
![]()