![]()
Images can be either attached to a topic, or added as new topics or as floating images that can be moved freely. You can use professionally designed map images from the MindManager Library or your own image from a file. You can also use an image for the map background and add images to the text notes. Commands for organizing and editing your images can be used from the Library task pane.
 |
Need more images?Check out Mindjet.com for high resolution and graphically rich images, guaranteed to bring your MindManager maps to life. Add these bold graphics to your to-do lists, meeting agendas, project plans or any map content to add depth and highlight key information. |
What do you want to do?
Do one of the following:
On the Status
Bar, click the Task Panes
button ![]() , then click Library.
, then click Library.
On the Insert tab, in the Topic Elements group, click the Image arrow, and then click Insert Image From Library.
Select the topic(s).
In the Library, click the Images category, then navigate to the image you want to add.
Click the image preview.
Re-size or reposition the image within the topic space if desired.
Drag the image from the Library to the map.
|
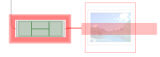
A red visual cue means the image will be added as a subtopic of the highlighted topic. To create a floating topic, press SHIFT as you drag to prevent the image from becoming attached to a topic as you move it. |
|
A green visual cue means the image will be attached to the topic. Note that you can then drag the image to position it within the topic space in one of 4 locations. |
|
No cue (image is in an empty space) means the image gets added as a floating image. You can drag the image to fine-tune its location. |
You can add images from files in bmp, emf, wmf, gif, jpeg, pcx or png formats.
Transparent GIFs and transparent 256 color PNGs are supported.
Do one of the following:
Right-click a topic, click Image, and then click From File
Select a topic. On the Insert tab, in the Topic Elements group, click the Image arrow, and then click Insert Image From File.
Navigate to the image file and click Insert.
Re-size or reposition the image within the topic space if desired.
Do one of the following:
Right-click the map background, click Insert Floating Image, then click From File.
Click the map background. On the Insert tab, in the Topic Elements group, click the Image arrow, and then click Insert Image From File. Click the location for the floating image.
Navigate to the image file and click Insert.
You can drag the image to fine-tune its location. Press SHIFT as you drag to prevent the image from becoming attached to a topic as you move it.
You can paste existing images from other applications into MindManager topics. You can also paste other items (like tables from Word, data ranges from Excel, etc.) as an image. The Paste Special command indicates which formats are available.
Copy the image from the original application (usually CTRL+C).
Click where you want the image pasted:
If you select a topic the pasted image becomes a new subtopic.
If you click inside the topic text, the image will be pasted inside (attached to) the topic.
If you click on the map background the image is pasted as a new floating topic.
Press CTRL+V.
Copy the item from the source application (usually CTRL+C).
Click where you want the image pasted:
If you select a topic the image can be pasted inside, or as a new subtopic.
If you click on the map background the image is pasted as a new floating topic.
On the Home tab, in the Clipboard group, click the Paste arrow, and then click Paste Special.
The Paste Special As dialog shows the available formats for the copied item. Click Picture or Bitmap, and then:
Click Paste to create a subtopic or floating image.
Click Paste Inside to attach the image to the selected topic.
Select the topic, then click the image. Handles appear to show that it is selected.
Drag the handles to re-size the image: corner handles maintain the aspect ratio, side handles allow stretching.
Floating images can be moved freely around the map (just drag them; hold down the Shift key as you drag to prevent them from becoming attached). Attached Images stay inside their associated topics, but they can be copied or moved to another topic or to become a floating image.
Select the topic with the image you want to move or copy.
Click the image. Handles will appear to show that it is selected.
Drag the image to a new location.
Visual cues appear to show how the image will be added: green shows it will be attached to the topic (top, bottom, left or right positions), red indicates that it will become a new topic; no cue means the image will become a floating image.
Drop the image at the new location.
Select the topic, then click the image. Handles appear to show that it is selected.
Press DELETE.
Bitmaps are converted to metafiles when they are exported to a Word document. You can switch off this behavior using the MindManager Notes option settings for Export conversions ( RTF).
During export to web pages all images are automatically converted to either 256 color GIF files (includes bitmaps that were previously metafiles, to retain their " metafile transparency") or to JPEG files (all bitmaps with color resolution > 256).