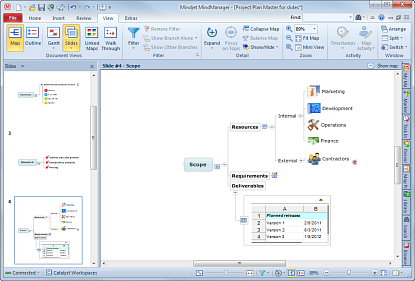
In Slides view, you can create and manage a set of slides for a map. Each slide shows a branch of the map. This can help focus attention on a specific part of the map for presentation or printing.
When you start Slides View, the Slide pane appears at the left of your
screen. This where you create and manage your slides. Branches with associated
slides are marked with a special icon ![]() .
.
Once you have created slides, you can print them, display them in a slide show, or export them to Microsoft PowerPoint.
What do you want to do?
On the View tab, in the Document Views group, click Slides.
The Slides pane will appear at the left of the screen.
Do one of the following:
Right-click a topic on the map, and then click New Slide from Topic.
On the View tab, in the Document Views group, click the Slides arrow, and then click New Slide from Topic.
The new slide will appear in the Slides pane.
On the map, the topic is marked with a special icon
![]() that indicates that this
topic has a slide associated with it. If the topic has more than one associated
slide, it is marked with a multiple slide icon
that indicates that this
topic has a slide associated with it. If the topic has more than one associated
slide, it is marked with a multiple slide icon ![]() .
.
A topic can appear on multiple slides, either alone, or on a sub-branch on another slide.
When you click a slide in the Slides pane it is displayed in the main window. The gray box on each slide indicates the area that will be printed or displayed in a slide show. The title bar at the top of the main window displays the name of the slide you re viewing, and a button to return to viewing the whole map.
You can change how the branch is displayed (expanded or collapsed) on the slide, and edit the branch's topics using the normal editing commands.
To adjust a slide's boundary, view the slide and drag the boundary box.
To reset the boundaries for all slides to their original locations, click the Slides pull-down at the top of the Slides pane, and then click Reset Page Boundaries.
To see the page boundary for each slide in the thumbnails, click the Slides pull-down, and then click Show Page Boundary in Thumbnails.
To return to the full map view, click Show Map at the top of the main window when viewing a slide.
To ensure that your slides reflect the current state of the map, you can refresh them.
Click the Slides pull-down arrow in either location:
At the top of the Slides pane.
On the View tab, in the Document Views group.
In the pull-down menu, click Refresh Slide Thumbnails.
Click the Slides pull-down arrow in either location:
At the top of the Slides pane.
On the View tab, in the Document Views group.
Click Print Slides. You can choose to print all the slides or individual slides here.
Configure the Page Setup Options and use Print Preview to check the output.
Click the Slides pull-down arrow in either location:
At the top of the Slides pane.
On the View tab, in the Document Views group.
Click Slide Show.
Use the controls at the bottom of the screen to step through your slides.
Click the Close button (at bottom-right) to exit the slide show.
Click a slide in the Slides pane and use the pull-down to Rename or Delete the slide.
To remove all slides from the map, click the Slides pull-down and then click Delete All Slides.
Deleting a slide does not remove the topics from the map.
Work with Microsoft PowerPoint