Add visual elements
Visual elements can be used to indicate connections (relationships)
or groupings (boundaries), or simply to make topics more memorable (images).
What do you want to learn about?
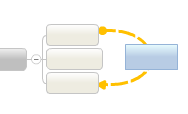
Relationships
Sometimes
a relationship exists between two (or more) topics, and you want
to illustrate this on your map. You can add a relationship line
that connects two topics, and label it if you wish. You can change
the look of the relationship using the Task
Pane's Format settings. |
|
Add a relationship
On the
Ribbon's Insert tab, click Relationship.
Hint:
Right-click a topic, and then click Insert
Relationship.
 When
the cursor changes to the Relationship cursor, click the first topic,
and then click the second topic.
When
the cursor changes to the Relationship cursor, click the first topic,
and then click the second topic.
The relationship line appears connecting the two topics. The topics
will remain connected even if they are moved. If you move one or both
of the topics connected by a relationship, the line will automatically
adjust.
Modify and format the relationship

|
When you select a relationship,
handles appear so you can re-shape it or change its connection
point.
|
Change the shape of the line
Relationship lines follow an optimal path by default because their Auto
Layout attribute is enabled. If you re-shape the line, the Auto Layout
option is automatically disabled. If you want the line to return to its
optimal path you can re-enable the Auto Layout option in the right-click
shortcut menu.
Connect to a different topic
Format the line's style and color
Select the relationship line(s).
Use the commands on the Ribbon's
Home tab to change its line style and color.
For more options, open the Task Pane and use the Format
group settings.
Add a callout (label) to the relationship
Select the Relationship.
On the Ribbon's Home tab, click
Callout.
Hint:
Right-click the relationship line, and then click Insert
Callout.
When the generic callout appears
enter your text.
Format the callout using the settings
on the Ribbon's Home and Design tabs.
Remove a relationship
Right-click the relationship line, and then click Delete Relationship.
Boundaries
Boundaries come in two basic types: grouping boundaries and summary
boundaries.
|
|
|
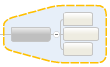
Grouping boundaries
can be used to emphasize the
relationships between topics and subtopics with an outline surrounding
an area on a map with your choice of line type and an optional
fill color.
|
|
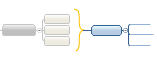
Summary boundaries
can be used to reduce a set
of subtopics into a single summary topic and then allow this topic
to grow again. |
Create a boundary
Select
the topic whose subtopics you want to group with the boundary.
On
the Ribbon's Insert tab, click Boundary.
Hint:
You can add boundaries within boundaries.
Format, modify, or copy a boundary
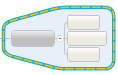
|
When you select a boundary, blue highlighting
appears to show that it is selected. Then you can change the boundary's
formatting.
|
Format a boundary
Select the boundary.
Use commands on the Ribbon's Home
and Design tabs to change its line style, fill color, and transparency.
For more options, open the Task Pane and use the Format
group settings.
Add a summary topic (callout) to a boundary
Select the boundary.
On the Ribbon's Home tab, click
Callout.
Hint: Right-click the boundary and click
Insert Callout.
When the generic callout appears
enter your text.
Format the callout using the settings
on the Ribbon's Home and Design tabs.
Hint: You can expand the
summary topic into a new topic tree by adding subtopics to it.
Remove a boundary
Hint:
Right-click the boundary and click Delete
Boundary.
Move or copy a boundary
Select the boundary and click
Cut or Copy
on the Ribbon's Home tab.
Select a topic. The boundary will
enclose this topic and its subtopics.
Click Paste
on the Ribbon.
Images
You
can add images from JPG, GIF, and PNG files to your
map. Images can be either attached to an existing topic or added
to new topics. You can add images to topics, subtopics, floating
topics, and callouts. |
|
Add an image
Select
a topic, or create a new topic, callout, or floating topic.
On
the Ribbon's Home tab, click Image.
Right-click
a topic then click Add Image.
Choose the image you want to insert
on the topic.
Position the image
The image placement settings allow you to orient the image relative
to the topic text.
Select the topic that contains
the image.
On the Ribbon's Design tab, click
Align Image, and select the
placement you want to use.
Re-size an image
Select
the image inside the topic.
Drag
the corner handles  to re-size
the image. Hold Shift as you drag to
change the image's aspect ratio.
to re-size
the image. Hold Shift as you drag to
change the image's aspect ratio.
To return the image to its original size, right-click
the image, and then click Reset Image
Size.
Remove an image
See also:
View
and navigate
Format
a map
Version 9.3
script src="http://www.mindjet.com/js/onlinehelp.js" type="text/javascript">