Each project you create has a main project map. You can add other maps to a project (or folder) by creating new maps or by uploading maps that you have created with the Mindjet desktop app. Once a map is in a project or folder, you can edit it in the mapping window.
Note: The maximum file size for uploads is 64MB.
When you open a map, other users with Edit access can simultaneously open and edit the map, and you can see their edits in real time. This is called co-editing.
If you want to edit a map, but prefer to “lock” it so that other users cannot edit it, you can check out the map. While the map is checked out, users with Edit access cannot edit it, though they can open a read-only copy. When you check out a map, you can choose to edit it online, or make a local copy that you can edit offline. While you are working on the local copy, the original map remains on the server. When you are done editing, you check in the map to save your edits, or discard the checkout to ignore your changes.
You can create, upload, edit, manage, and share your maps with other users in Projects view and Library view.
Note: Your role and your access rights determine your ability to use certain features of ProjectDirector. If performing an action is not permitted, the command will be disabled. (For more information about the different permissions levels, see Understand Permissions.)
To create a map:
In Projects view or Library view, select a project.
On the ribbon, click New Map.
In the New Map dialog enter the Map Name, and then select Blank Map to create a map from scratch, or select a template to use.
Hint: If you want to see a wider selection of maps that you can download and use, click the link to Maps for That!
Click Create to open a new map in the mapping window.
See Mapping for more information about creating and editing maps.
The map is immediately available to anyone who has Edit or Read-Only permission in the project or folder. You can give other people access to it by Sharing it with them.
If you have an existing map you created in Mindjet desktop stored locally on your computer, you can upload it to your Mindjet account using ProjectDirector. Once uploaded, the map is stored on the Mindjet server.
Note: If you upload a map that has links to other maps and files, you should upload these files at the same time. Once uploaded, you must edit the map’s attachments and hyperlinks to point to the uploaded files, otherwise they will continue to point to local copies on your computer.
To upload a map:
In Projects view or Library view, select the project or folder where you want to upload the map.
Note: The maximum file size for uploads is 64MB.
On the ribbon, click Upload.
Drag the map files into the dialog from your system, or click Choose File, select the map, and then click Open.
The uploaded map appears in the location you selected. If you don't see the uploaded file appear after a few moments, refresh your browser.
The map is immediately available to anyone who has Edit or Read-Only permission in the project or folder. You can give other people access to it by Sharing it with them.
Mindjet can search for text in a map name, or within a map, across all files and folders within an account. Searches are specific to an account: if you want to search for the same text in more than one account, you must conduct separate searches in each account.
To search for a specific filename or text string:
At the top of the Projects view Projects list
or at the top of the Library view General File Library list, enter
the text in the Search files
field. (To clear the field, click ![]() .)
.)
Press Enter.
If the search finds one or more matches, the matched file(s) are displayed in the Project or Library Files list. If no match is found, a “no files found” message is displayed.
To display the complete list of files after a search, click the project or folder name.
The Search Results from each search are saved in the left pane, below the list of projects and folders.
Click an item under Search Results to display the matching files.
To remove results, right-click the search topic in the Search Results list, and then click Delete.
If you want to view a map without editing it you can open a read-only copy. You can open a map this way even if another user has it checked out for exclusive editing, but you cannot edit the map.
To open a read-only copy of a map:
In the Projects view or Library view Files list, right-click the map name.
Click Open as Read-Only.
When you open a map for editing, by default other users can edit it at the same time. If you prefer to edit the map exclusively, you can check it out.
If the selected map is being edited online by other users, this is indicated in the Files list Status column, and you can open the map to co-edit in real time with these other users.
If the map is checked out for exclusive editing by another user, this
is indicated by a lock icon . The map will only open
in read-only mode; you cannot edit it until the map is checked in again
by the user who has it checked out.
. The map will only open
in read-only mode; you cannot edit it until the map is checked in again
by the user who has it checked out.
To open a map:
In the Projects view or Library view Files list, double-click the map you wish to edit.
The map opens in mapping window. In this view, you'll see indicators that show if the map is read-only and who else is editing the map, and “hints” when a portion of the map has been revised.
In the mapping window, the Map Status indicator at upper-left indicates if the map is read-only. |
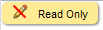 |
Maps are opened in Read-only mode if:
You have Read-only access to the map.
The map has been checked out by another user (indicated
by a lock in the Files list).
The map is still loading.
If the map can be edited, the Map Status indicator will not appear.
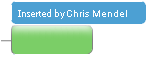
When you are editing a map, an indicator at lower-right tells you if someone else is viewing or editing the map. Point to this indicator to see the names these users. |
 |
If other users are also editing the map (and if you view the area they are editing) you will see their changes in real time. |
 |
See Mapping in ProjectDirector for more information about creating and editing maps.
Maps are automatically saved at intervals. Between saves, the pending changes are accumulated.
ProjectDirector will ask you if you want to save your pending changes any time the map will be closed (for example, when you switch to a different view, or log out). You can also save these at any time:
In mapping window, click File > Save.
If you want to edit a map and prevent other users from making changes to it while you are editing, you must check it out. When you check out a map, you effectively lock it: other users cannot edit it, though they can open a read-only copy. Other users also cannot delete or move a map that is checked out.
When you are finished editing the checked out map, check it back in so that others can view the revised map or edit it themselves.
Note: You cannot check
out a map that is already checked out by another user (indicated by a
lock icon
in the Files list Status column). While waiting for the map
to be checked back in, you can open a read-only copy.
To check out a map:
In the project view or Library view Files list, right-click the map that you want to check out.
Click Check Out.
Edit the map as usual. Your changes will not be saved back to the online version until you check it back in.
Hint: If you want to continue to work on the map without an Internet connection, you can Save a local copy, edit the map in your Mindjet desktop version, and then check it back in with ProjectDirector when you re-connect. Make a note of the location where you saved the map, as you will need to tell ProjectDirector its location. [More information]
Once you’ve finished editing a map, you need to check it in so that others can edit it. Until you check it in, or discard the check out, other users can open a read-only copy but they cannot edit the map.
In Projects view or Library view, right-click the checked-out map you want to check in.
Click Check In.
In the Check In dialog, select the option for checking in the file that is appropriate for the type of check out you performed:
Select Check In if you edited the map only in ProjectDirector, and then click Check In. This option unlocks the map you edited online so that others can edit it.
Select Upload if you edited a local copy in a Mindjet desktop app. Click Add File to select the map's location, click Open, and then click Check In.
You can also select Create version before check-in to create a version before you check in the map.
Note: Your ability to create versions depends on your account type. You are not required to create a version before you check in a map. For more information on version control, and why you might want to use it, see Create and use versions.
The map is shown as checked in and the lock is removed.
Sometimes you check out a map, then change your mind about editing it, or you want to discard the edits you made. Since you do not want to save your changes, you do not need to check it in. You can simply discard the check out.
To discard a check out on a map:
Right-click checked-out map whose check out you want to discard.
Click Discard Checkout.
The map is unlocked and available for editing.
When a map is shared with users, those users are assigned a Permission for the map that determines whether they can edit or only view it. You can change the Access Levels for users in the People & Permissions pane.
Note: Your account type, your role in the account, and your own access rights determine your ability to change Permissions for other users. If performing an action is not permitted, the command will be disabled. (For more about the different permission levels, see Account roles and Understand access rights.)
Select the map that you want to change the Access Levels for.
The People & Permissions pane lists all the people who have currently access to the map.
Click the arrow next to the name of the person whose Permission you want to change.
(File Permission options will vary depending upon the type of user, and (if the map is in a project or folder) their Project or Folder permission. For more information, see Understand permissions.)
Select the Access Level you want for this user:
Read-only allows a user to open and view the map. With this level of access, the user cannot delete, edit, download, or check out the map, and they cannot share it. If the map is in a folder, and a Member has Edit access to that folder, you cannot reduce their access to Read-only.
Edit allows a user to delete, edit, download, and check out the map. Members can share the map with others.
Remove revokes the user's access to the map. They can no longer view or edit the map.
Note: You cannot rename a map that is checked out.
In the Project or Library view Files list, right-click the map name.
Click Rename.
The filename becomes an entry field.
Type the new name and press Enter.
In the Project or Library view Files list, right-click the map name.
Click Duplicate.
The duplicate appears in the files list, with the name "Copy of...".
You can move maps between projects and folders, as long as you have Edit access to both the source and the destination. You cannot move maps between accounts.
Note: You cannot move a map that is checked out.
To move a map:
Drag it from the Files list to its new location in the left pane within a project or folder.
The map appears in its new location. If you don’t see the map appear after a few moments, refresh your browser.
Hint: You can also right-click and use the shortcut menu Cut, Copy, and Paste commands to move or copy the map.
Deleting a map removes it from the account, and users will no longer have access to it. If you have created versions of the map using the Version feature, all versions of the map are also deleted.
Owners and Administrators can undelete map or permanently delete them.
Note: You cannot delete a map that is checked out.
Right-click the map you want to delete.
In the shortcut menu, point to Delete, and then click Delete.
Click OK to confirm the deletion, or Cancel to retain the map .
Right-click on any file in the Files list, point to Delete, and click Show Deleted Items.
Deleted maps will appear in the Files list with
a trash icon  .
.
Right-click the map you want to undelete.
In the shortcut menu, point to Delete, and then click Undelete. (If the map's project or folder was also deleted, you must undelete the project or folder as well to make the map accessible to other users.)
The map is restored with the same permission settings that it had before it was deleted.
Use these same steps to permanently delete a map , except select Permanently Delete in step 4. Once the map is permanently deleted, it cannot be recovered.
To hide the deleted maps again:
Right-click any file name, point to Delete, and then click Hide Deleted Items.
If you want to make a local copy of a map that is stored online in a project or folder, you can download a copy.
(If you wish to edit a ProjectDirector map offline, use the Check Out feature. To learn more, see Check out a map.)
To download a copy of a map:
In Projects view or Library view files list, right-click the map name.
Point to Download, and then click Download.
The file is downloaded to the default location determined by your browser.
See also:
Save, open, close, and print maps
Version 9.3
script src="http://www.mindjet.com/js/onlinehelp.js" type="text/javascript">